I Challenge You To Challenge Me – Think you can help?
I want to present you with a challenge to present me with a challenge. This will be ongoing and I want to continue accepting submissions for as long as possible. Send me images of anything you find inspiring, boring, interesting, mundane, ugly, beautiful, anything (that’s appropriate) you like and my challenge is to create a makeup look based on it. Flowers and animals are obviously gorgeous and inspiring and I welcome photos of them but please don’t feel obligated to only send me pretty images. I really want to stretch my brain here and do some different looks. The only stipulation is that they don’t be photos of makeup but everything else is fair game.
How you can send me the images:
Pinterest is a great site for inspiration. If you like, you can create a new board and title it “Inspirations” or “Makeup Challenges” (Just make sure you let me know you created one) or you can re-pin an image and I believe there’s a way to mention my username so that I see it. Or simply (right click) save an image from there and email it.
Email the images or links to them to me at NDunn1030@yahoo.com
Facebook, you can post them to your profile and mention me (display name – Niki Dunn) or message me there.
Twitter, username MakeupByNikiD
If you have any questions or if you want to let me know you have some images for me, email me or comment below. I’ll contact when I post my pictures so you can see my “challenge reply” :o)
I look forward to getting some really amazing challenges from you guys! I know you beautiful creatures won’t disappoint :o)
Stay Beautiful ❤
Smokey Look for About $20
In the last of the drugstore makeup posts I have a purple smokey/night time look with a sheer shimmery lip color. See below the photos for directions and products.
To get a better look at the photo of the products, click on the thumbnail to enlarge.


- I applied shade #3 of the purple eyeshadow from the lash line up to the crease and a little bit past the crease. In order to give the eye look more continuity, I also applied it to the lower lash line.
- Shade #2 (a deeper purple) should be applied to the crease to give it definition and depth and blended to eliminate harsh lines.
- The lightest eyeshadow #4, should be used as a highlight along the brow bone, just under the eyebrow. Also when applying the lightest shade you should spend a few extra moments blending it into the color below it to soften it.
- Eyeshadow #1 is the darkest purple and I applied it with a small brush along the top lash line and the outer half of the lower lash line and forming a bit of a point past the outer corner.
- I applied the CG black eyeliner along the top lash line, the outer corner of the lower lash line and in the water line.
- Then I applied the NYX blush and two coats of the L’Oreal mascara.
- When it comes to the lip color for this look I chose a light shimmery gloss to wear alone since the eyes are already darker, smokey and colorful. I like to keep a balance with emphasis on the lips and flattering, subtle eye colors or vice versa. But if you want more color simply layer the gloss over a light shade of lipstick. It would even work well with the Pink Chocolate Ulta lipstick from the previous look.


Daytime Look for about $20
Without further ado, here’s the look! Peek below the photos for the products and directions. The last photo only has a different lip color. Since I saved so much money I was able to get two colors for this look. I really like the look of red lips with a neutral eye but not everyone goes for it. So why not have both?
To get a better look at the photo of the products, click on the thumbnail to enlarge.


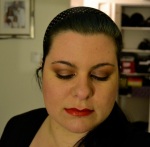
- For the eyes I applied the NYX eye pencil in Yogurt all over my eyelid, up to the brows and into the inner corners.
- Then the lightest L’Oreal eyeshadow shade is applied from the lash line up to the crease and a little bit past the crease and along the lower lash line.
- The darkest shadow should be applied lightly with a fluffy brush to the crease and blended softly to avoid any harsh lines. I also applied the darker shade along the very outer corner of the lower lash line for some depth and continuity (Only applying products to the top lid and absolutely nothing to the bottom tends to look unbalanced and incomplete.)
- I used the brown eyeliner very close to the lash line and a little on the lower lash line but just in the outer corner and applied mascara.
- Finish with blush and lipstick color of choice.
Beauty On The Cheap! Two Total Looks with Drug Store Finds for About $20
I’ll be posting the actual photos of the looks complete with instructions this week. But first I wanted to share how I arrived at such an awesome deal for everything.
Splurging may be fun once in a while but lets be serious, some of the prices of products you see are a little bonkers! For us beauties on a budget there are always options out there. These two looks only cost about $20 each for everything you need besides your own regular tried and true foundation. But first, just some info about the purchases themselves…….
Also I just want to say that I don’t believe in “beauty secrets”. I’m going explain everything I do, how I do it, and what I use. I don’t believe in pulling punches or being sneaky and I don’t like makeup artists who do so. Why keep good info to yourself?
A note about the purchases:
I highly recommend signing up for frequent buyer/discount cards AND company emails. Every day I have an Ulta email with a coupon or deal in them. Ulta has a lot of items on sale, I knew I’d get more bang for my buck there. Is Ulta a drug store? No. HOWEVER they sell all the same drug store brands that supermarkets and drugstores themselves carry. But with Ulta you have the opportunity of more sales and using more coupons. That’s the reason I bought drugstore products from Ulta and not the supermarket. L’Oreal, NYX and Cover Girl products were ‘buy one, get one half off’ and Ulta cosmetics were ‘buy two, get two free’ (excluding mineral makeup). How can ya pass that up?!
By the way if you aren’t acquainted with NYX Cosmetics I highly recommend that all beauties (no matter the budget) get to know them. Besides the fact that there is often a sale on their products, they are a fabulous deal on a great quality product even when not on sale. And thankfully Ulta sells them so they are super accessible.
Also the same mascara and blush were used in both looks because they are good solid stand-by products. Versatile products will always save you money since they can be used with everything and L’Oreal Voluminous is one of my favorite mascaras. You will also save a few extra dollars if you are the type that prefers not to wear blush.
So how much did we save on the makeup?
After the discounts and a coupon were applied, I saved a whopping $28 even. Yup! I was able to put together a “day time” look with neutral colors and I saved so much that I was able to get two lip color options. The second look is a colorful “night time” smokey look.

And a word about application:
Ever heard the saying “It isn’t what you say, it’s how you say it.”? Well with makeup it isn’t what you use, it’s HOW you use it. Most drugstore eyeshadows come with a small sponge-tip applicator and I do not recommend using those little suckers. Those little holes will build up with eyeshadow and you end up just wiping the shadow all around without good color payoff or any ability to blend the colors. I always advise investing in a good set of brushes and with all the holiday sales going on now you can get a nice sized set for a great price. And secondly, blend until your darn hand falls off! Ok maybe not…. but blend a lot! The difference between harsh and heavy and soft and pretty is blending. Sweep across the eyelid with a fluffy brush in small circles or a windshield wiper motion after applying. Lastly, do NOT get discouraged, practice makes perfect. Trite but true.
Stay tuned for the results!! ;o)
Bachelorette Party Look – Smokey Black/Silver
My girl wanted a classic smokey eye with a little shimmer for a bachelorette party she was attending. I applied thick false lashes and brushed a little bit of glitter onto the lash tips for some sparkle.


Bad Fairy – Halloween Look
What fun is a good fairy? I prefer a bad one ;o) The only thing missing were wings but locating black and red ones didn’t happen in time for the shots.


